Specification and Documentation of Rail Grinding Work in Europe
By Dr. Wolfgang Schoech • July, 2007
Rail grinding practices and requirements have evolved over the years. In the past, rail grinding programs were controlled by railway personnel who were responsible for selecting the sites, choosing the number of grinding passes and determining when a program was finished. Today, grinding programs and procedures are very different. With privatisation and restructuring, railway staffs have been reduced considerably. Many of the on-site tasks that were once performed by railway personnel now have been transferred to the grinding contractor. With this change has come the development of specifications and procedures, which include detailed documentation, that contractors must adhere to before the work is accepted.
European railways established the Euro-Norm EN 13231 “Railway applications — Track — Acceptance of works” in 2006. Part 3 of this standard, which was developed by the European Committee for Standardization (CEN), deals with the “Acceptance of rail grinding, milling and planing work in track.” The specifications, which represent an envelope of all of the individual railways’ standards, deal with longitudinal and transverse profiles, and the condition of the rail surface. While tolerances vary, depending on line characteristics, on-site recordings are typically required to document the grinding work. Documentation (and payment only against certified performance) assures consistently good results. It also provides insight into the development of rail surface irregularities and profile changes, which enables railways and contractors to develop better grinding procedures and strategies.
The European Context
European railways, which are primarily state owned, developed independently. This, and “pride,” which leads each railway to believe that its specifications are the best, explains the wide range in national designs and standards. Track gauge, for example, ranges from meter gauge to 1668 mm broad gauge. More than 20 standard rail profiles are in use. Even though grinding machines are designed to fit within the smallest overall clearance envelope, the wide array of in-track safety systems in use pose obstacles that make it difficult to operate the same grinding machine on multiple properties. Beyond design differences, there are also distinct operating characteristics.
On high-speed passenger lines that operate at speeds of up to 300 km/hr, stable running, in which equivalent conicity plays a determining role, is the highest priority. Noise and fatigue are other important issues. On urban transit systems where noise is the predominant issue, corrugation must be kept to a minimum. Mixed traffic lines are susceptible to wear, fatigue and noise. On the few dedicated freight traffic lines that exist, wear and fatigue are the greatest concern. Lines that handle high-speed passenger trains during the day and freight traffic at night represent the most challenging conditions under which to properly maintain rail and track.
Wheel/Rail Contact
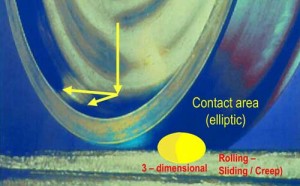
Vertical, lateral and longitudinal forces are transmitted to vehicles and track through a small elliptical wheel/rail contact area (see Figure 2). Creep, rolling and sliding forces are also generated at the contact patch. As a result of this rolling contact, wheels develop small irregularities such as corrugation, surface cracks and indentations.
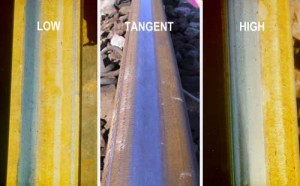
While wheels inevitably wear through wheel/rail interaction, proper maintenance can significantly reduce the amount of wear and surface damage that occurs to the rail. But if poor wheel conditions are a given, the only way to improve contact (and wear) conditions is to modify the rail head profile. With today’s grinding technology, the rail can be shaped to meet virtually any desired contact geometry, including the high or low rails in curves, or both rails in tangent track (see Figure 3).
Grinding Practices
Earlier generation rail grinders were fitted with fixed grinding motors that required many grinding passes to remove short-pitch and short-wave corrugations, and improve rail surface conditions. Today, modern rail grinding equipment can achieve the desired rail profile and surface condition in a single pass.
The maintenance strategy has also changed. Where railway personnel once held sway, the contractor now is responsible for planning, execution and quality control. While the railway may indicate where to grind, it’s the contractor’s duty to plan and execute the grinding plan, and to document that the finished work meets the specification. Certification of such, accompanied by documentation, is required for payment.
Process versus Product Specification
Grinding programs are either “process-” or “product-” based. While both types of program require pre- and post-grind inspections, process-based grinding programs specify the process to be used — the type of pattern and number of passes required to bring the rail into an acceptable condition. Depending on the effectiveness of the selected pattern, the finished grind quality may be better-than or less-than expected.
Product-based specification, which identifies a specific profile to be achieved for each section of track, has become the favored European approach. Product-based grinding is typically performed following rail condition monitoring, when critical values exceed pre-set thresholds or at fixed intervals. If the grinding cycle is right, the specified profile can be reestablished without much difficulty.
Quality Control
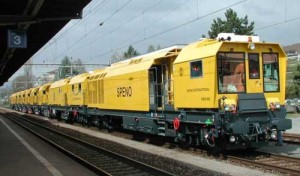
Specifications, which specify the longitudinal and transverse profiles, metal-removal rates and finished rail surface conditions, also provide the basis for quality assurance upon completion of the work. Measurement tools are now available to continuously record the longitudinal and the transverse profile during grinding. Rolling contact fatigue can be measured through Eddy-Current-technology. Speno International has fitted two machines with such systems. Metal removal can be spot-checked by measuring the rail height before and after grinding at the same location.
In Europe, two quality standards are defined for the longitudinal profile over four wavelength bands, which range from 10mm to 1m. Maximum peak-to-peak variations after grinding may not exceed 0.01mm for short waves and 0.1mm for defects up to 1m in length. Since some locations cannot be ground completely, such as level crossings and short plugs, the specification allows some percentage of the recordings or of the measured total length to be outside these limits. Quality Class 1 requires 95% of the finished rail to be within the limits (90% of the long waves must be within the limits). On Class 2 track, which deals with 30mm – 100mm and 100mm – 300mm wavelengths, 90% of the recordings must be within the specifications.
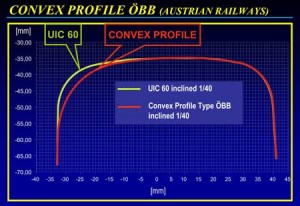
For the transverse profile, the shape and production tolerance must be specified. The European norm requires the contractor to produce the target profile that is given by the railway. German railways generally request all rails to be ground to the 60E2 geometry, which is derived from the UIC60 rail profile. Another specified profile, called the gauge-widening profile, provides 2.5mm gauge widening on each rail. French railways start with the basic UIC60 profile, which is inclined 1/20. Other target profiles, such as anti-headcheck-profiles, which provide gauge corner relief, have since been developed. Depending on the amount of gauge undercutting, they are called preventive or corrective profiles. Banverket, the Swedish infrastructure company, has designed a specific “MB3” target profile for its ore line in the north. This profile, which is completely different from the installed rail profile, was designed to better accommodate hollow-worn wheels. Figure 4 shows a newly developed target profile created in Austria. This so-called convex rail assures stable running at higher speeds, while reducing rolling contact fatigue.
Tolerances are checked by superimposing the target profile over the measured in-track profile. Two reference points, one in the center of the railhead and one at the gauge reference point, are specified. A zone of maximum radial deviation from the target profile is specified for the gauge side of the rail. On the field side, the profile is checked to 5 degrees tangent.
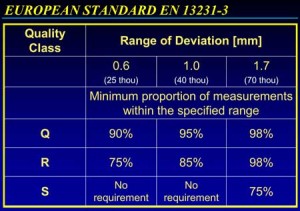
The European specifications allow for three quality classes (see Figure 5). The most severe permits maximum deviation of +/- 0.3mm; the least stringent permits maximum deviation of +0.7/-1mm. (There is a percentage allowable outside these values.) Quality class Q, which is typically required for high-quality track, requires that 90% of all the recordings or the measured lengths must be within the range of +/-0.3mm; only 2% may be outside any specification. Quality class S requests only 75% to be within the 1.7mm range. German Railways (DB AG) and French Railways (SNCF) consider Quality class S standards to be too low, and require quality standards Q and R. In most cases, both rails must be measured at least once per grinding section, every 500 or 200 meters. On DB AG’s high-speed lines, measurements must be taken every 50 meters.
Roughness is also specified. The rail grinding contractor must measure six points on each rail after grinding; only one may be outside the specified value of 10 microns. While the recording frequency is not specified, it is typically done once per grinding shift. Metal removal also is not specified. The typical metal removal rates are 0.3mm for new rail, and 0.2mm for cyclical preventive grinding programs. Metal removal rates for corrugation removal typically are 0.1mm below the corrugation troughs. Metal removal documentation, if required, must be provided at five locations at least 1/2 meter apart. Metal removal rates must be documented on a weekly or daily basis, depending on the railway.
Other criteria relating to “the finish” are included in the European specifications. Facet width, for example, should be less than 10mm on the crown radius, 7mm on the shoulder, and 4mm on the gauge side. The variation of the facet width should not be more than 25%. Additionally, the rail may not exhibit coloring or bluing after grinding.
Product Documentation
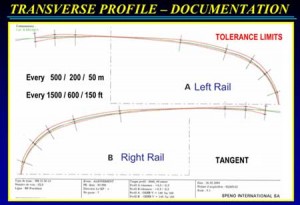
European specifications require a number of parameters to be measured and recorded in order to document the completed grinding work. As a result, every grinding machine is fitted with a recording trolley, which houses a laser-based transverse profile measuring system and a longitudinal profile system that is able to distinguish between the four wavelength ranges. Profiles are plotted at the requested intervals and stored in a database, or printed for the customer. Figure 6 shows an example of a left and right-hand rail in a tangent, along with the tolerance limits.
If the grinder (such as those used for turnouts or transit systems) does not have a continuous measurement system installed, measurements must be taken manually. Metal removal can be checked by superimposing transverse profiles that are measured with a Miniprof or similar device at the same location on the rail before and after grinding. Roughness meters, with a precision of 1 micron or better, are used to measure the rail surface roughness. Documentation can be delivered in an electronic format or as printed reports.
The extensive use of recording systems and the data that is collected provide European railways and rail grinding contractors with excellent knowledge of changes in rail conditions. The data can be further exploited to improve grinding programs and the specifications in order to reduce dynamic forces and internal stresses. The data can also be used to optimize rail profiles, improve grinder productivity and reduce overall program costs. A precisely specified and well-controlled program allows more grinding work to be done for less. And by creating artificial wear and removing the right (minimal) amount of metal from the right place, rail grinding can extend the overall life of the rail.
![]()
This article is based on a presentation by Dr. Wolfgang Schoech, Manager of External Affairs, Speno International SA, at Interface Journal and Advanced Rail Management’s Wheel/Rail Interaction ’07 Seminar.
Dr. Wolfgang Schoech is Manager of External Affairs, Speno International SA

